OpenFOAMのベンチマークテストを動かしてみる
さて前回の続きです。ようやく。
さて、この手のインストールをしたらやりたいのはベンチマークです。
ベンチマークということは適当な計算対象をみつけて計算をぶん回すことになります。
作業環境は OpenFOAM-v2112 on WSL2(Ubuntu20.04)です。v2206出ちゃったじゃん。
今回はOpenCAE学会のOpenFOAMベンチマークテストにしてみたいと思います。あ、今日学会だったんですね(無知)。
対象とする流れ場はチャネル流れです。平行平板間流れともいいます。書いて字の如く、無限に広い平行に置かれた平板の間を通る流れのシミュレーションです。
そんなもの計算して何が楽しいんだとなるんですが、ただ壁があるだけの流れ場はとてもシンプルが故に指標としては最適です。
もちろん流れ自体も面白くて、シンプルな形状なのに流速を上げていくと乱流(なんかぐちゃぐちゃした流れ)になっていって計算するのがどんどん大変になっていきます。
この辺が流体のおもしろさなんだと思います。しらんけど。
(不正確なのはわかってるんですけど正確に書く能力も気力もないのでこのくらいの説明にしてます)
計算の流し方は
https://gitlab.com/OpenCAE/OpenFOAM-BenchmarkTest/-/wikis/channelReTau110/How_To_Run_jp
にあるんですけどこの通りにやっても全ッ然うまくいきません。
そう、実はスーパーコンピュータ向けに書いてあるので個人のPCでやることなんてほぼ想定されていないんですよね。
どういうわけか、
git clone git@gitlab.com:OpenCAE/OpenFOAM-BenchmarkTest.git
から動かないです。これは謎。以下エラーメッセージ。
Cloning into 'OpenFOAM-BenchmarkTest'...
git@gitlab.com: Permission denied (publickey).
fatal: Could not read from remote repository.

Please make sure you have the correct access rights
and the repository exists.
(2022/10/22追記):解決しました。↓のコマンドで行けます。
git clone https://gitlab.com/OpenCAE/OpenFOAM-BenchmarkTest.gitgit@~はgitlabのアカウントがないと使えないみたいです。httpアクセスならOKですね。そりゃそうだ。(追記終わり)
gitlabからcloneした経験がないのでよくわからないですが、ここはブラウザでダウンロードしてwsl内にコピーして展開します。(wgetでも何でも良いです)
cp -a template-NoBatch System-bohyoここまでは手順に従います。
しかしここで「環境に合わせて適宜書き換えます」と言われても困ります。
困っててもしょうがないので適当になんとかしていきます。
差分形式でうまく書けないので試行錯誤してます。わかりにくくすみません。
decomposeParDict.sh
修正前
  1 #!/bin/bash
  2 #
  3 # Main
  4 #
  5 # 最適化スクリプトで生成されたパラメータ定義ファイルを評価
  6 source $0.param
  7 # ppn(process per node)とノード数から,領域分割数を算出
  8 numberOfSubdomains=`expr $decomposeParDict_ppn \* $decomposeParDict_node`
  9 # 元のケースディレクトリから必要なディレクトリをリンク
 10 if [ ! -d include ]
 11 then
 12     mkdir include
 13     (cd include
 14         ln -s  ../../include/* ./
 15     )
 16 fi
 17 for file in 0 constant system
 18 do
 19     [ -L $file ] || ln -s ../$file .
 20 done
 21 # decomposeParDictを生成
 22 rm -f include/decomposeParDict
 23 cat > include/decomposeParDict <<EOF
 24 numberOfSubdomains $numberOfSubdomains; // 領域分割数(並列数)
 25 method $decomposeParDict_method; // 分割手法
 26 preservePatches (sides_half0 sides_half1 inout_half0 inout_half1);
 27 multiLevelCoeffs
 28 {
 29   method  scotch;
 30   domains ($decomposeParDict_ppn $decomposeParDict_node);
 31 }
 32 EOF
 33 cat > decomposePar.sh <<EOF
 34 #!/bin/bash
 35 module purge
 36 module load gcc/4.8.5
 37 module load openfoam/v2012
 38 source \$WM_PROJECT_DIR/etc/bashrc
 39 decomposePar >& log.$0.\$$
 40 echo \$$
 41 EOF
 42 chmod +x decomposePar.sh
 43 JOBID=$(./decomposePar.sh)
 44 echo $JOBID
 45 exit 0
修正後
1 #!/bin/bash
2 #
3 # Main
4 #
5 # 最適化スクリプトで生成されたパラメータ定義ファイルを評価
6 source $0.param
7 # ppn(process per node)とノード数から,領域分割数を算出
8 numberOfSubdomains=expr $decomposeParDict_ppn
9 # 元のケースディレクトリから必要なディレクトリをリンク
29 method scotch;
30 domains ($decomposeParDict_ppn );
31 }
35-37 削除
tuneOpenFOAMGridsearch.sh
修正前
#!/bin/sh

# Json filenames
jsonFilenames="\
tuneOpenFOAM-mesh_0.37M.json \
tuneOpenFOAM-mesh_3M.json \
tuneOpenFOAM-mesh_24M.json \
"
修正後
#!/bin/bash

# Json filenames
jsonFilenames="\
tuneOpenFOAM-mesh_0.37M.json \
"
#tuneOpenFOAM-mesh_3M.json \
#tuneOpenFOAM-mesh_24M.json \
行頭のシェバンを/bin/sh から /bin/bash にしておくと何故か動きます。
修正前
163 module purge
164 module load gcc/4.8.5
165 module load openfoam/v2012
167 mpiexec -n $numberOfSubdomains pimpleFoam -parallel >& log.$0.\$$
修正後
163 module purge
164 module load gcc/4.8.5
165 module load openfoam/v2012
167 mpirun -n $numberOfSubdomains pimpleFoam -parallel >& log.$0.\$$
./tuneOpenFOAM-mesh_0.37M.json
ppnは1ノードあたりの並列数を表す(process per node)みたいです。
大型計算機前提のコードだというのがよくわかりますがPCで動かしますよ今回は。
修正前
 10         "decomposeParDict_node": [ 1, 2, 4, 8 ],
 11         "decomposeParDict_ppn": [ 56 ],
修正後
 10         "decomposeParDict_node": [ 1 ],
 11         "decomposeParDict_ppn": [ 8 ],
mesh.sh
修正前
124 module purge
125 module load gcc/4.8.5
126 module load openfoam/v2012
修正後
(削除)
ここまでやったらあとは手順に従って
./tuneOpenFOAMGridsearch.sh &> log.tuneOpenFOAMGridsearch.shで実行です。しばらくかかります。
あとはtuneOpenFOAM-mesh_0.37M.jsonとかの中身を見てお好みで並列数変えてみたりして色々動作させると良いと思います。
注1:mpi使うので1並列だと動作しません
注2:コア数以上の並列数動作しません(8コア16スレッドだから16並列行けると思ったんですけどエラーで走りませんでした。OpenMPIは誤魔化せないのか…?以下エラー内容。
There are not enough slots available in the system to satisfy the 16
slots that were requested by the application:

  pimpleFoam

Either request fewer slots for your application, or make more slots
available for use.

A "slot" is the Open MPI term for an allocatable unit where we can
launch a process.  The number of slots available are defined by the
environment in which Open MPI processes are run:

  1. Hostfile, via "slots=N" clauses (N defaults to number of
     processor cores if not provided)
  2. The --host command line parameter, via a ":N" suffix on the
     hostname (N defaults to 1 if not provided)
  3. Resource manager (e.g., SLURM, PBS/Torque, LSF, etc.)
  4. If none of a hostfile, the --host command line parameter, or an
     RM is present, Open MPI defaults to the number of processor cores

In all the above cases, if you want Open MPI to default to the number
of hardware threads instead of the number of processor cores, use the
--use-hwthread-cpus option.

Alternatively, you can use the --oversubscribe option to ignore the
number of available slots when deciding the number of processes to
launch.
出力ファイルはCSVで出てきます。並列化なし(1並列)の結果が出せないので並列化効率とかの検証には片手落ちですね。まぁシステムごとの比較をするためのコードなのでそういう使い方はしないんだと思います。
参考にCSVをグラフにして貼り付けておきます。なんか1つの条件で何回も計算してますね。
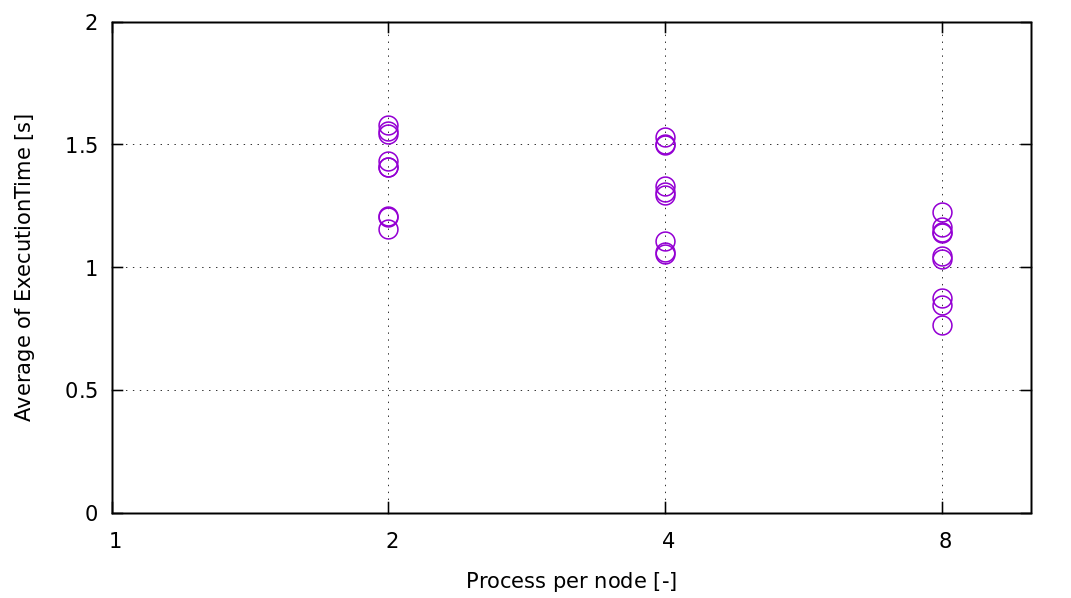
横軸は並列化数、縦軸は1ステップあたりの実行時間です。全然並列化効果ないですねぇ、なんでだろう。とかぼんやり考えます。まぁ計算機のことは何も知らないので答えは出ないんですけど。Ryzenの1コアあたりの性能が高いからということにしておきましょう。
もうすこし全体のセル数増やせばいい感じに並列化効果出るかもしれません。0.37Mはさすがに少ない気がします。パソコンでも秒殺だしどう考えてもスパコン向けではない。
音楽再生しながらなのでこんなもんでしょう(そうか?
次回はOpenFOAMのチュートリアルで並列化効率を出すスクリプトを書いてみたいと思います。pythonなんて高級なもの使うのは趣味じゃないのでシェルスクリプトで行けるところまでやりたいと思います。
というわけで、今日はこのへんで。